- Notificaciones de qBittorrent en Telegram a través de Home Assistant
Si tienes qBittorrent corriendo en Docker y un Home Assistant al que le pides cada vez más cosas, tarde o temprano surge la idea: quiero que me avise por Telegram cada vez que termina una descarga. Suena trivial, pero como veremos, el camino tiene alguna trampa. En este artículo repasamos, paso a paso, cómo montarlo de forma robusta.
El montaje de referencia es Home Assistant en Docker, qBittorrent (imagen linuxserver.io) también en Docker, HA sirviendo por HTTPS con certificado de Let’s Encrypt, y un bot de Telegram ya configurado como servicio de notificaciones. Ajusta las IP y nombres a tu entorno.
La idea general
qBittorrent tiene una función llamada “Ejecutar programa externo en torrent terminado”. La usaremos para que, al completar una descarga, lance un pequeño script que envíe los datos del torrent a un webhook de Home Assistant. HA recibe ese webhook, dispara una automatización y esta manda el mensaje a Telegram con el formato que queramos.
El flujo completo es: qBittorrent termina la descarga, ejecuta un script, el script hace una petición al webhook de HA, la automatización se dispara y llega la notificación a Telegram.
Paso 1: Crear el webhook en Home Assistant
Empezamos por el lado de HA. Un webhook trigger no necesita nada en
configuration.yaml: basta con definir la automatización. Añade esto a tus automatizaciones- id: qbittorrent_descarga_completada alias: qBittorrent - Descarga completada trigger: platform: webhook webhook_id: qbittorrent_completado # ID action: - service: notify.notif_telegram_bot data: message: >- Descarga completada {{ "\n" }}Nombre: {{ trigger.json.name | default('desconocido') }}La URL del webhook será
https://TU_IP_HA:8123/api/webhook/qbittorrent_completado. Como no lleva autenticación, elwebhook_iddebe ser largo e impredecible: es tu única barrera. Los datos que enviemos llegarán disponibles entrigger.json.*.Un apunte importante si sirves HA por HTTPS: el webhook hay que llamarlo con
https://y, si el certificado es autofirmado o el cliente no lo valida, con la opción de saltarse la verificación. Si lo llamas por HTTP plano, la conexión se cierra sin respuesta y te vuelves loco buscando el fallo donde no está.Paso 2: Probar el webhook antes de seguir
Antes de tocar qBittorrent, conviene comprobar que HA recibe correctamente. Desde cualquier máquina de la red local:
curl -vk -X POST -H "Content-Type: application/json" \
  -d '{"name":"prueba"}' \
  https://TU_IP_HA:8123/api/webhook/qbittorrent_completado
La respuesta debe ser HTTP 200 OK. Si además ves en la cabecera algo como
Server: Python/3.10 aiohttp, es tu Home Assistant respondiendo. Si obtienes “Empty reply from server”, casi seguro estás hablando en HTTP a un puerto que espera HTTPS: añade lasy la opción-k.Paso 3: El script dentro del contenedor
Aquí está la decisión clave del montaje. Se puede intentar meter el comando
curlcompleto directamente en el campo de qBittorrent, pero es frágil: los nombres de torrent llevan espacios y corchetes (por ejemplo[HDTV][Cap.105]), y el anidamiento de comillas para construir un JSON válido acaba rompiéndose. La solución limpia y fiable es un script que reciba los datos como argumentos y construya la petición él mismo.Es la solucion limpia porque me volvi loco intentandolo directamente con comandos del estilo a este
/bin/bash -c 'curl -k -X POST -H "Content-Type: application/json" -d "{\"name\":\"$0\",\"category\":\"$1\",\"tags\":\"$2\",\"num_files\":\"$3\",\"size\":\"$4\",\"path\":\"$5\",\"tracker\":\"$6\"}" https://192.168.1.20:8123/api/webhook/qbittorrent_completado' "%N" "%L" "%G" "%C" "%Z" "%F" "%T"Estos comandos dentro del docker funcionan bien , pero al ser ejecutados por qBittorrent los lanza pero no se ejecutan , es un problema endémico de qBittorrent en docker , ya que probe en varias versiones y en todas igual , ponerlo en un script externo nos ahorrara unas cuantas horas y algun dolor de cabeza
Nos gusta declarar cada variable con un nombre claro al principio; en un script un poco complejo se agradece muchísimo a la hora de leerlo. Crea el archivo dentro del contenedor, en una ruta persistente como
/config:#!/bin/bash TORRENT_NAME=$1 # Nombre del torrent TORRENT_CATEGORY=$2 # Categoría TORRENT_TAGS=$3 # Tags (separados por coma) TORRENT_CONTENT_PATH=$4 # Ruta del contenido (igual que root en multi-archivo) TORRENT_ROOT_PATH=$5 # Ruta raíz (primer subdirectorio del torrent) TORRENT_SAVE_PATH=$6 # Ruta de guardado TORRENT_NUM_FILES=$7 # Número de archivos TORRENT_SIZE=$8 # Tamaño del torrent (bytes) TORRENT_TRACKER=$9 # Tracker actual # Log de depuración: confirma que el script se ejecuta y con qué datos echo "$(date) | $TORRENT_NAME | $TORRENT_SIZE bytes" >> /config/qbt_notify.log /usr/bin/curl -k -X POST \ -H "Content-Type: application/json" \ -d "{\"name\":\"$TORRENT_NAME\",\"category\":\"$TORRENT_CATEGORY\",\"tags\":\"$TORRENT_TAGS\",\"num_files\":\"$TORRENT_NUM_FILES\",\"size\":\"$TORRENT_SIZE\",\"path\":\"$TORRENT_CONTENT_PATH\",\"tracker\":\"$TORRENT_TRACKER\"}" \ https://TU_IP_HA:8123/api/webhook/qbittorrent_completado \ >> /config/qbt_notify.log 2>&1Dos detalles que ahorran horas de depuración. Primero, usar la ruta absoluta de curl (
/usr/bin/curl, confírmala conwhich curldentro del contenedor), porque el proceso que lanza qBittorrent puede tener un PATH mínimo y no encontrar el comando. Segundo, el registro en/config/qbt_notify.log: esa línea de log y la redirección de la salida de curl (>> ... 2>&1) son tu mejor amigo para saber si el script se ejecuta de verdad y qué devuelve.Paso 4: Permisos correctos
Las imágenes de linuxserver.io ejecutan qBittorrent como el usuario
abc(el PUID/PGID que configuras), no como root. Si creas el script como root, asegúrate de queabcpuede ejecutarlo y escribir el log:docker exec qbittorrent chown abc:abc /config/qbt_notify.sh docker exec qbittorrent chmod 755 /config/qbt_notify.sh
Puedes verificar que todo funciona como lo hará qBittorrent ejecutando el script directamente como
abc:docker exec -u abc qbittorrent /config/qbt_notify.sh \ "Peli de prueba [HDTV]" "" "" "/downloads/completas/Peli" \ "/downloads/completas/Peli" "/downloads/completas" "2" "536815980" ""
Si al mirar
/config/qbt_notify.logves la línea con la fecha y el nombre, y la salida de curl indica éxito, el script está listo.Paso 5: Configurar qBittorrent
Ahora sí, en la interfaz de qBittorrent ve a Herramientas → Opciones → Descargas, marca la casilla “Ejecutar programa externo en torrent terminado” y en el campo pon la llamada al script pasando los parámetros de qBittorrent, cada uno entre comillas para que los nombres con espacios lleguen enteros:
/config/qbt_notify.sh "%N" "%L" "%G" "%F" "%R" "%D" "%C" "%Z" "%T"
El orden importa y debe coincidir con el script. qBittorrent sustituye cada token por su valor:
%Nes el nombre,%Lla categoría,%Glas etiquetas,%Fla ruta del contenido,%Rla ruta raíz,%Dla ruta de guardado,%Cel número de archivos,%Zel tamaño en bytes y%Tel tracker.Paso 6: La automatización final, con formato e iconos
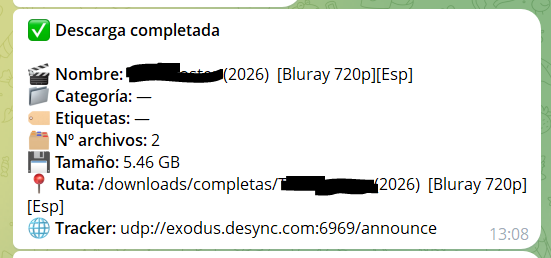
Con los datos llegando a HA, pulimos el mensaje. Usamos
parse_mode: htmlporque, a diferencia de Markdown, no se atraganta con los corchetes[ ]de los nombres de episodios. Eso sí, escapamos&,<y>en los campos de texto libre por si algún nombre los contiene, respetando siempre el orden de escapar&en primer lugar:- id: qbittorrent_descarga_completada alias: qBittorrent - Descarga completada trigger: platform: webhook webhook_id: qbittorrent_completado # ID secreto, trátalo como una contraseña action: - service: notify.notif_telegram_bot data: message: >- ✅ Descarga completada {{ "\n" }}🎬 Nombre: {{ trigger.json.name | default('desconocido') | replace('&','&') | replace('','>') }} {{ "\n" }}📁 Categoría: {{ trigger.json.category | default('') | default('—', true) | replace('&','&') | replace('','>') }} {{ "\n" }}🏷️ Etiquetas: {{ trigger.json.tags | default('') | default('—', true) | replace('&','&') | replace('','>') }} {{ "\n" }}🗂️ Nº archivos: {{ trigger.json.num_files | default('?') }} {{ "\n" }}💾 Tamaño: {{ (trigger.json.size | default(0) | int(0) / 1073741824) | round(2) }} GB {{ "\n" }}📍 Ruta: {{ trigger.json.path | default('desconocida') | replace('&','&') | replace('','>') }} {{ "\n" }}🌐 Tracker: {{ trigger.json.tracker | default('') | default('—', true) | replace('&','&') | replace('','>') }} data: parse_mode: htmlEl patrón
default('') | default('—', true)es útil: si un campo llega vacío (muchos torrents no tienen categoría ni etiquetas), muestra un guión en lugar de dejar el hueco en blanco. Y elsize | default(0) | int(0)evita que el cálculo de gigabytes reviente si por algún motivo no llega el tamaño. Tras editar, recarga las automatizaciones desde Herramientas de desarrollador → YAML → Recargar automatizaciones.Resolución de problemas: lo que aprendimos por el camino
Este montaje tiene varios puntos donde es fácil perder el rastro, así que vale la pena tenerlos presentes.
Si el
curlde prueba devuelve “Empty reply from server”, el problema es de esquema: estás llamando por HTTP a un puerto HTTPS. Añade lasy la opción-k.Si qBittorrent registra en su log “Ejecutando programa externo” pero no ocurre nada, el detalle a revisar es el quoting del comando y las rutas absolutas. Meter un
curlcon JSON directamente en el campo, con su maraña de comillas anidadas, suele fallar porque qBittorrent no parsea los escapes como lo haría una shell. Delegar en un script, como hicimos, elimina ese problema de raíz.Si el mensaje de Telegram no llega pero el webhook sí entra en HA, mira el log de Home Assistant. Un error típico es
UndefinedError: 'dict object' has no attribute...: significa que la plantilla intenta leer un campo que no viene en el JSON. Por eso ponemosdefault()en todos los campos. Otro clásico es que Markdown se atragante con los corchetes del nombre; de ahí el cambio a HTML.El log de depuración
/config/qbt_notify.loges lo que convierte “no funciona” en “aquí está el error”. Cuando todo esté rodado, puedes comentar esas líneas del script para no llenar el disco.Conclusión
Con este montaje, cada descarga que completa qBittorrent te llega al móvil por Telegram, con un mensaje limpio y con iconos, sin depender de servicios en la nube ni de integraciones frágiles. La pieza que marca la diferencia es el pequeño script intermediario: mantiene qBittorrent haciendo lo mínimo (llamar a un programa con argumentos) y deja toda la lógica de formato en Home Assistant, que es donde mejor se controla. Un patrón que, por cierto, sirve para muchas otras integraciones de este estilo.
Y con esto y un bizcocho …..

Tecnología , cacharreo y domotica casera
Hola Antonio!! LLegue a tu web buscando un tutorial de como instalar un ZBDongle-E en un QNAP TS 251D pero aun ando bastante liado jaja ojala me puedas dar una mano si tienes un tiempo libre!! Abrazo desde Argentina!!
Buenos dias
Cuando quieras lo miramos
Saludos